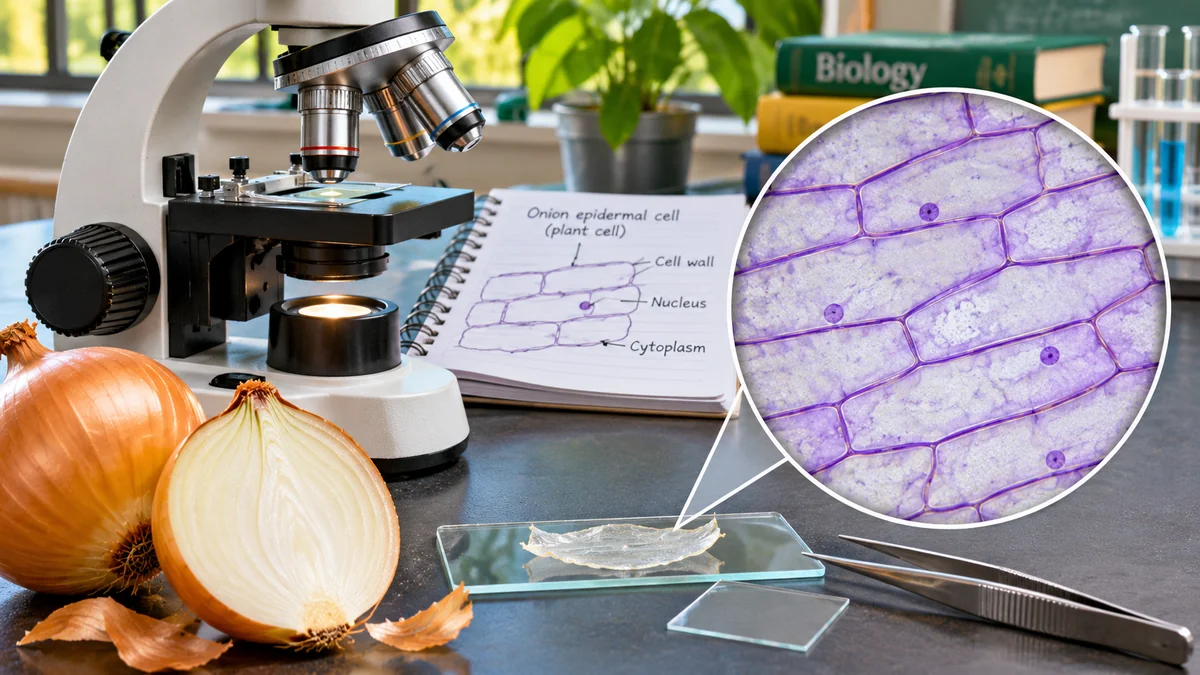
What do onion cells look like under a microscope? The thin inner skin of an onion bulb contains tightly packed, elongated plant cells that resemble rows of bricks. Under a classroom compound light microscope, you can usually see their clear cell walls and, after suitable staining, may identify the nucleus and surrounding cytoplasm. A large central vacuole occupies much of a mature cell, although its boundary is not always sharply visible. Because the bulb's inner epidermis is storage tissue, you should not expect to see green chloroplasts in this specimen.
This onion cells under a microscope activity helps students make a simple wet mount, focus a microscope, draw evidence accurately and estimate cell size. It is designed for a supervised secondary-school classroom or introductory biology session, with an optional water-only method when staining reagents are unavailable. Allow roughly 30–45 minutes, depending on microscope experience.
The activity follows established microscopy teaching methods published by The Open University , Salt Lake Community College's biology lab and OpenStax Biology 2e .
Learning objectives
By the end of the practical, students should be able to:
- Prepare a thin onion-epidermis wet mount and handle a slide and coverslip safely.
- Identify and draw the cell wall, cytoplasm and, when visible, the nucleus.
- Explain why onion bulb cells are plant cells even though they normally lack visible chloroplasts.
- Calculate a compound microscope's total magnification and estimate the size of a cell.
- Distinguish an actual observation from a textbook feature that cannot clearly be seen.
Why onion epidermis makes a useful classroom specimen
An onion's fleshy bulb scales are modified leaves. The nearly transparent membrane on the inner surface of a scale is the epidermis, a relatively thin sheet of cells that can be peeled away with forceps. It is widely used for beginner microscopy because the cells are comparatively large, have well-defined walls and lie next to one another in an orderly layer.
Unlike a thick chunk of onion tissue, a single epidermal sheet allows light to pass through with less obstruction. That makes it easier to focus through the sample and recognise individual cell boundaries. The Biology LibreTexts onion wet-mount protocol specifically uses the inner transparent membrane and shows an example at 400×.
Materials: onion-cell microscopy equipment
| Material | Purpose |
|---|---|
| Fresh onion bulb | Source of inner epidermal tissue |
| Compound light microscope | Viewing cells with transmitted light |
| Clean glass slides and coverslips | Holding a thin wet mount |
| Fine tweezers or forceps | Peeling and flattening epidermis |
| Dropper and clean water | Keeping the sample moist |
| Paper towel or lens-safe tissue | Absorbing excess liquid without pressing glass |
| Dilute school-approved iodine stain (optional) | Making some cellular structures easier to distinguish |
| Teacher-prepared onion section, small scissors if needed | Providing a manageable piece without student knife use |
| Notebook, pencil and ruler | Recording magnification, diagrams and measurements |
| Safety glasses and other PPE required by local rules | Safe handling of stain and glass |
Safety first: A teacher or competent adult should prepare the onion sections and supervise young students. Do not give learners an unsupervised sharp knife, scalpel or razor. Coverslips are fragile: hold them by their edges and dispose of breakages using your laboratory's sharps procedure. Use only an approved dilute educational stain under the teacher's risk assessment and the supplier's safety instructions; iodine may irritate or stain skin and clothing. Never taste laboratory materials, and wash hands after the activity.
For a younger or less-equipped group, the teacher can prepare wet mounts in advance. A water-only slide with no stain is a valid first observation, although the nucleus may be difficult to identify.
How to prepare an onion-cell slide: step-by-step method
Step 1: take a small section of the onion
Have the teacher cut the onion and separate one fleshy inner scale. The epidermis you need is the thin, almost transparent film on the inner curved surface—not the thick, juicy flesh. A patch roughly 5 mm by 5 mm is sufficient; exact dimensions are not important as long as the tissue fits comfortably beneath the coverslip.
Step 2: peel off a single epidermal layer
Grip the edge of the membrane with clean forceps and peel gently. Work slowly so that the membrane remains in one thin sheet rather than folding or tearing into a thick mass. If it is difficult to hold, transfer it with a tiny drop of water. This is the step that most influences slide clarity.
Step 3: lay the membrane flat on a slide
Place one small drop of clean water in the middle of a clean microscope slide. Lower the membrane into the drop and use the forceps to smooth out wrinkles. The tissue should lie flat and should not stack into overlapping layers. Avoid a large puddle: excess liquid can make the coverslip float.
Step 4: optionally add a stain
For a stained version, use one small drop of teacher-approved dilute iodine solution according to your school's safety procedure. Stain helps increase contrast; it is not required to prove that cells exist. A teacher can also place stain next to an already mounted coverslip and draw it underneath with absorbent paper on the opposite side, as illustrated in the college wet-mount protocol .
Never mix different stains or use concentrated chemicals. A prepared slide is preferable where safe handling cannot be assured.
Step 5: lower the coverslip carefully
Hold the coverslip by its edges and lower it at a slight angle onto the wet specimen. This helps reduce trapped air bubbles. Do not press down hard: the coverslip can break or damage the cells. Gently touch absorbent paper to the edge of the coverslip to remove excess fluid if necessary.
Step 6: focus under the lowest objective
Place the slide securely on the stage and choose the 4× objective if available (or the lowest-power objective on your instrument). Centre the sample over the light and look through the eyepiece. Use the coarse focus at low power, carefully following the microscope's instructions; then adjust illumination and fine focus until cell-wall outlines appear.
When changing to a higher-power lens, check the clearance and use fine focus only according to the instrument's guidance. Never force an objective against the slide.
Step 7: examine cells at 100× and, if appropriate, 400×
With a common 10× eyepiece, a 10× objective gives 100× total magnification. At this setting, look for rows of rectangular or elongated cells. Switch to a 40× objective only when the sample is in focus, the slide is correctly mounted and the teacher permits it. At 400×, fewer cells fit into the field, but features such as a stained nucleus may be easier to inspect.
Note: The best magnification is the one that produces a clear, informative image. Enlarging a blurry image does not necessarily reveal more detail. OpenStax distinguishes magnification from resolution.
Step 8: record what you actually see
Draw three to six connected cells, using single, clear outlines instead of shading everything. Label the obvious cell walls, and label a nucleus only if you can distinguish one. Record the magnification, specimen, date, stain used and any limitations such as trapped air bubbles. Do not add structures simply because a textbook diagram contains them.
What should onion cells look like under the microscope?
A successful preparation often reveals an orderly brick-wall or honeycomb-like grid of elongated cells, usually with fairly straight boundaries and adjoining corners. Their dimensions and orientation vary with the tissue and how the membrane was mounted. An unstained sample may look mostly transparent, while an iodine-stained sample often has more visible contrast.
| Structure | What to expect | Can you reliably see it? |
|---|---|---|
| Cell wall | Distinct rigid border between neighbouring cells | Usually yes |
| Nucleus | Small rounded or oval region, sometimes near the edge | Often after appropriate staining, but not every cell |
| Cytoplasm | Thin material inside the cell wall, sometimes concentrated near the edge | Sometimes, especially with contrast or stain |
| Central vacuole | Large clear-looking region taking up much of the cell | Often inferred; its membrane may be difficult to distinguish |
| Cell membrane | Very thin boundary directly inside the cell wall | Usually not separately resolved in a standard wet mount |
| Chloroplasts | Green photosynthetic organelles | Not expected in ordinary inner onion bulb epidermis |
| Mitochondria or ribosomes | Smaller organelles and molecular machinery | Not identifiable as individual structures with this simple classroom setup |
Observation versus inference: A cell may have a membrane, mitochondria and a vacuole even when your instrument cannot resolve them. You can explain their biological roles, but a scientific drawing must distinguish visible evidence from additional labels provided for learning. For more advanced discussion of how researchers observe cellular structures, see SuperEducational's article on mapping millions of brain cells using single-cell atlases ; these methods go far beyond a simple school microscope.
Why are there no chloroplasts in ordinary onion bulb cells?
Students sometimes expect every plant cell to contain green chloroplasts. That is incorrect. Chloroplasts specialise in photosynthesis, but different plant tissues perform different jobs. The inner epidermal cells of a fleshy onion bulb are associated with storage structures and are generally not green photosynthetic leaf cells. They therefore do not normally show visible chloroplasts when prepared as described here.
To observe chloroplasts directly, a green aquatic plant such as Elodea can make a better classroom specimen. The college biology lab protocol treats onion epidermis and Elodea as complementary slides: one makes cell walls and nuclei accessible; the other is useful for observing chloroplasts.
The broader topic of how green plant tissues capture sunlight is developed in SuperEducational's explainer on measuring photosynthesis from space . That article addresses an entirely different scale of observation, but it helps connect cell biology with ecosystem science.
Microscope magnification: how much bigger are the cells?
A compound microscope uses an eyepiece (ocular lens) and an objective lens. Total magnification equals eyepiece magnification multiplied by objective magnification. For example, a 10× eyepiece paired with a 10× objective gives 100× total magnification.
| Eyepiece | Objective | Total magnification | Useful observation |
|---|---|---|---|
| 10× | 4× | 40× | Locate the membrane and large groups of cells |
| 10× | 10× | 100× | Compare the shapes and arrangement of cells |
| 10× | 40× | 400× | Inspect a stained nucleus and cell-wall detail if focus and resolution permit |
Do not confuse the magnification of a digital photograph on a screen with the microscope's optical magnification. Screen sizes and image scaling differ, so a scale bar or calibrated measurement is more reliable than quoting a large “zoom” number from an image.
How to estimate the size of an onion cell
You can estimate size if you know the diameter of the field of view at the objective in use. This may be measured at low power using a ruler, or more precisely using a stage micrometer or calibrated eyepiece reticle.
Imagine that the field of view at 100× total magnification is 1.8 mm across and you observe approximately six onion cells placed end-to-end across its diameter. The approximate length of one cell is:
1.8 mm ÷ 6 = 0.30 mm = 300 micrometres (µm).
This is an illustrative worked example, not a measurement from this article's image. Actual cells vary, and a row of cells must be oriented along the measurement direction for this approach to make sense. Counting cells side-by-side measures a different dimension. For reliable measurements, note your field-of-view calibration and repeat the observation across several cells.
The Open University microscope activity describes measuring the field of view and estimating onion-cell dimensions. Remember: 1 mm = 1,000 µm.
Student observation sheet: copy into your workbook
Activity title: Onion cells under a microscope. Question: What plant-cell structures can we observe in onion epidermis?
| Observation | Your result |
|---|---|
| Slide type | Fresh onion epidermis wet mount |
| Stain used | Water only / approved dilute iodine (circle one) |
| Objective and eyepiece magnification | __________ |
| Total magnification | __________ |
| Approximate cell shape | __________ |
| Cell wall visible? | Yes / No / Uncertain |
| Nucleus visible? | Yes / No / Uncertain |
| Chloroplasts visible? | Yes / No / Uncertain |
| Field-of-view diameter, if known | __________ mm |
| Estimated cell dimension | __________ µm |
| Observation limitations | __________ |
Scientific drawing checklist: Use a sharp pencil and clean lines; draw multiple neighbouring cells; add a descriptive title; write the observed magnification; and label only clearly identified parts. Record uncertainty honestly. A microscope drawing documents evidence rather than trying to look like a colourful poster.
Troubleshooting: what if you cannot see the onion cells?
The view is completely dark
Check that the microscope light is on, the lowest objective is clicked into place and the slide is centred over the illuminated opening. Follow the manufacturer's instructions for adjusting the condenser, diaphragm and illumination. Never stare into a bright external light source to fix a microscope problem.
Everything looks like a blurry lump
The epidermis may be folded or too thick, or the objective may be out of focus. Return to low power, select a flatter part of the sheet and focus again. Replace the slide if the onion tissue is stacked in layers.
There are round bubbles over the cells
Bubbles can form when the coverslip is dropped flat. Prepare a new slide and lower the coverslip slowly at an angle. Bubbles are often round with a dark outline, unlike the adjoining brick-shaped onion cells.
You can see cell walls but no nuclei
That is common in an unstained mount or an unsuitable focus plane. With teacher approval, try an appropriately stained slide and fine-focus slowly. Do not manufacture a nucleus in the drawing if you cannot distinguish one.
All the cells disappear when you increase magnification
At high power the field of view narrows and the depth of focus decreases. Centre an interesting region at low power before switching to the next objective. Adjust fine focus gently. Avoid using coarse focus at high power when the objective is close to glass.
Optional extension: compare unstained and stained preparations
If the teacher's safety policy allows it, make two otherwise similar slides from the same onion: one in water and one using an approved dilute iodine solution. Keep microscope settings and magnification as similar as possible. Ask students to compare which structures are visible and whether stain genuinely improves confidence in identifying a nucleus.
This is a simple fair-test design, but students should recognise its limitations: two different epidermal pieces are not perfectly identical, and changes in thickness or focus may also affect the results. A stronger investigation would repeat the comparison across several preparations and record observations systematically.
Optional extension: compare onion bulb cells with green leaf cells
Where suitable material and supervision are available, observe a prepared green-leaf or Elodea slide and compare it with onion epidermis. In both, students should look for a cell wall; in the green specimen, chloroplasts may be visible. This helps demonstrate that plant cells share basic structures but become specialised for different functions.
Do not infer that onion epidermis contains no chloroplasts in every circumstance or that all green cells have the same number of chloroplasts. Report only what the actual specimens demonstrate.
Classroom discussion questions, with suggested answers
- Why is onion epidermis useful for microscopy? It forms a relatively thin, transparent sheet of large adjoining cells, so their boundaries can often be distinguished with a light microscope.
- What gives the cells their brick-like outlines? The relatively rigid cell walls that border each cell.
- Why add iodine stain? To increase contrast and help identify some otherwise faint internal structures; staining is optional and must be handled safely.
- Why might a nucleus be near the cell edge? A mature plant cell often has a large central vacuole, leaving a thin layer of cytoplasm around the edge where the nucleus may lie.
- Why are green chloroplasts usually absent? Inner onion bulb epidermis is not a strongly photosynthetic green tissue.
- What is the total magnification of a 10× eyepiece and a 40× objective? 400×.
- Can you see ribosomes with this setup? Not as individually identifiable structures using an ordinary school light microscope.
- What makes a drawing scientific? Accurate observation, simple outlines, honest labels, recorded magnification and a clear indication of uncertainty.
Frequently asked questions
What magnification do you need to see onion cells?
Onion epidermal cell walls are often easy to locate at 40× or 100× total magnification. At around 400× you may be able to examine some additional detail, especially after staining. Available resolution, slide quality and equipment vary.
Do onion cells have a nucleus?
Yes, intact living onion epidermal cells are eukaryotic and typically contain a nucleus. The nucleus may not be clearly visible in every unstained or poorly focused sample.
Why do onion cells look rectangular?
The supporting cell walls and orderly arrangement of the epidermal tissue create the familiar elongated, brick-like outlines. Not every plant cell has that shape.
Can onion skin be examined without iodine?
Yes. A water-only wet mount can reveal the cell walls. However, unstained internal structures, particularly the nucleus, may be difficult to distinguish.
What is the difference between an onion epidermis slide and an onion root-tip slide?
The inner bulb epidermis is primarily used to show typical plant-cell boundaries and structure. A specially prepared root-tip slide is commonly used to examine dividing cells and stages of mitosis. They are different tissues and should not be treated as interchangeable.
How long does this school activity take?
A teacher can allocate approximately 30–45 minutes for preparation, focusing, drawings, discussion and clean-up. Beginners may require longer.
Conclusion
Observing onion cells under a microscope is an accessible way to connect textbook cell diagrams with real biological evidence. A thin wet mount of onion epidermis should reveal adjoining plant cells with clearly defined walls. With appropriate staining and good focus, some internal features—including nuclei—may become easier to observe. The practical also teaches something equally important: a microscope has limits, and a sound scientific record distinguishes what you saw from what you only know should be there.
Start at low power, work safely, draw accurately, then use magnification and field-of-view measurements to turn a simple onion into a meaningful lesson in cell biology.